Java NIO와 멀티플렉싱 기반의 다중 접속 서버
Java NIO는 Java의 기존 I/O API를 대체하기 위해 Java 1.4 버전에서 도입된 I/O API입니다. 새로 바뀐 부분을 간략히 요약하면 다음과 같습니다.
- 채널과 버퍼
- Java NIO에서는 채널과 버퍼를 사용합니다. 서버에서 클라이언트와 데이터를 주고받을 때 채널을 통해서 버퍼(ByteBuffer)를 이용해 읽고 씁니다.
- 논블로킹(non-blocking) I/O
- Java NIO에서는 논블로킹 I/O를 사용할 수 있습니다. 예를 들어보겠습니다. 스레드가 버퍼로 데이터를 읽어달라고 채널에 요청하면, 채널이 버퍼에 데이터를 채워 넣는 동안 해당 스레드는 다른 작업을 수행할 수 있습니다. 이후 채널이 버퍼에 데이터를 채워 넣고 나면 스레드는 해당 버퍼를 이용해 계속 처리를 진행할 수 있습니다. 반대로 데이터를 채널로 보내는 경우에도 논블로킹으로 처리할 수 있습니다.
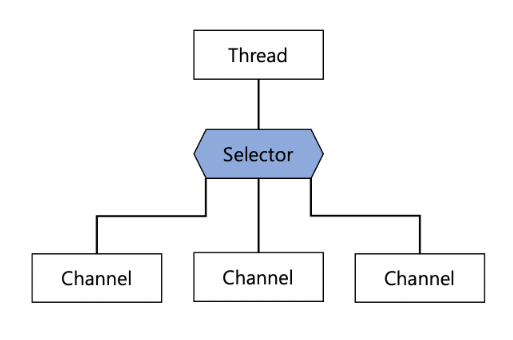
- 셀렉터
- Java NIO에는 여러 개의 채널에서 이벤트(예: 연결 생성, 데이터 도착 등)를 모니터링할 수 있는 셀렉터가 포함돼 있기 때문에 하나의 스레드로 여러 채널을 모니터링할 수 있습니다.
- 내부적으로 SelectorProvider에서 운영체제와 버전에 따라 사용 가능한 멀티플렉싱 기술을 선택해 사용합니다.
Java NIO에는 이 외에도 더 많은 클래스와 컴포넌트가 있지만 채널과 버퍼, 셀렉터가 API의 핵심입니다.
채널
Java NIO에서는 다음과 같은 여러 가지 채널을 제공하고 있습니다.
- FileChannel: 파일에 데이터를 읽고 쓴다.
- DatagramChannel: UDP를 이용해 네트워크에서 데이터를 읽고 쓴다.
- SocketChannel: TCP를 이용해 네트워크에서 데이터를 읽고 쓴다.
- ServerSocketChannel: 클라이언트의 TCP 연결 요청을 수신(listening)할 수 있으며, SocketChannel은 각 연결마다 생성된다.
버퍼
버퍼도 채널과 같이 ByteBuffer를 포함해서 여러 가지를 제공하고 있습니다. 버퍼를 사용해 데이터를 읽고 쓰는 것은 4단계로 진행됩니다.
- 버퍼에 데이터 쓰기
- 버퍼의 flip() 메서드 호출
- 버퍼에서 데이터 읽기
- 버퍼의 clear() 혹은 compact() 메서드 호출
채널은 양방향으로 사용하기 때문에 버퍼에 데이터를 쓰다가 이후 데이터를 읽어야 한다면 flip() 메서드를 호출해서 버퍼를 쓰기 모드에서 읽기 모드로 전환해야 합니다. 또한 모든 데이터를 읽은 후에는 버퍼를 지우고 다시 쓸 준비를 해야 하며, 이때 clear() 메서드를 호출해서 전체 버퍼를 지울 수 있습니다.
셀렉터
셀렉터를 사용하면 하나의 스레드가 여러 채널을 처리할 수 있습니다.
하나 이상의 채널을 셀렉터에 등록하고 select() 메서드를 호출하면, 등록된 채널 중 이벤트 준비가 완료된 하나 이상의 채널이 생길 때까지 블록됩니다. 메서드가 반환되면 스레드는 채널에 준비 완료된 이벤트를 처리할 수 있는 상태가 됩니다. 즉, 하나의 스레드에서 여러 채널을 관리할 수 있으므로 여러 소켓 연결을 관리할 수 있습니다. 셀렉터는 다음과 같이 사용합니다.
셀렉터 생성
Selector.open() 메서드를 호출해 셀렉터를 생성
Selector selector = Selector.open();
채널 등록
생성한 셀렉터에 채널을 등록할 때 채널의 register() 메서드를 사용
ServerSocketChannel channel = ServerSocketChannel.open();
channel.bind(new InetSocketAddress("localhost",8080);
channel.configureBlocking(false); // 논블로킹모드로 변환
SelectionKey key = channel.register(selector, SelectionKey.OP_READ); // 채널을 셀렉터에 등록
먼저 셀렉터에 채널을 등록하기 위해서는 반드시 해당 채널을 논블로킹 모드로 변환해야 합니다. 다음으로 register() 메서드를 호출하는데요. register() 메서드의 두 번째 매개 변수는 채널에서 발생하는 이벤트 중 셀렉터를 통해 확인하고자(알림 받고자) 하는 이벤트의 종류를 전달할 때 사용합니다. 이벤트에는 네 가지 종류가 있으며 SelectionKey 상수로 표시합니다.
- SelectionKey.OP_CONNECT
- SelectionKey.OP_ACCEPT
- SelectionKey.OP_READ
- SelectionKey.OP_WRITE
둘 이상의 이벤트 상수는 다음과 같은 방법으로 사용합니다.
int interestSet = SelectionKey.OP_READ | SelectionKey.OP_WRITE;SelectionKey
register() 메서드를 이용해 채널을 셀렉터에 등록하면 SelectionKey 객체가 반환됩니다. SelectionKey에는 다음과 같은 속성들이 있습니다.
- Interest set
- Ready set
- Channel
- Selector
- Attached object (optional)
Interest set
Interest set은 셀렉터에 등록된 채널이 확인하고자 하는 이벤트 집합(세트)입니다. 다음과 같이 SelectionKey를 이용해 Interest set을 확인할 수 있습니다.
int interestSet = selectionKey.interestOps();

boolean isInterestedInAccept  = interestSet & SelectionKey.OP_ACCEPT;
boolean isInterestedInConnect = interestSet & SelectionKey.OP_CONNECT;
boolean isInterestedInRead    = interestSet & SelectionKey.OP_READ;
boolean isInterestedInWrite   = interestSet & SelectionKey.OP_WRITE;
Ready set
Ready set은 셀렉터에 등록된 채널에서 바로 처리할 수 있도록 준비된 이벤트의 집합입니다.
int readySet = SelectionKey.readyOps();
Ready set은 위 interest Set과 동일한 방식으로 확인할 수도 있고, 아래와 같이 네 가지 메서드를 이용해서 확인할 수도 있습니다.
selectionKey.isAcceptable();
selectionKey.isConnectable();
selectionKey.isReadable();
selectionKey.isWritable();
Channel, Selector
SelectionKey를 이용해 채널과 셀렉터에 쉽게 접근할 수 있습니다.
Channel channel  = selectionKey.channel();
Selector selector = selectionKey.selector();
Attached object
SelectionKey에 객체를 첨부(attach)할 수 있습니다. 이를 통해 채널에 추가 정보 혹은 채널에서 사용하는 버퍼와 같은 객체들을 쉽게 첨부할 수 있습니다.
selectionKey.attach(object);

Object attachedObj = selectionKey.attachment();
SelectionKey를 통해 직접 첨부할 수도 있고, 셀렉터에 채널을 등록하면서 객체를 첨부할 수도 있습니다.
SelectionKey key = channel.register(selector, SelectionKey.OP_READ, object);
셀렉터를 이용해 채널 선택
셀렉터에 하나 이상의 채널을 등록한 후에는 select() 메서드를 사용해서 채널에 이벤트가 발생할 때까지 대기할 수 있습니다. select() 메서드는 accept, connect, read, write 이벤트를 처리할 준비가 된 채널을 반환하는 메서드로, 다음과 같이 세 가지 방식으로 사용할 수 있습니다.
- select(): 등록한 이벤트에 대해 하나 이상의 채널이 준비될 때까지 블록합니다. 이벤트를 처리할 수 있는 채널이 있다면 준비된 채널의 수를 반환합니다.
- select(long timeout): 준비된 채널이 없을 때 계속 블록하지 않고 timeout까지만 블록합니다(timeout은 ms 단위입니다).
- selectNow(): 준비된 채널이 있으면 즉시 반환하며, select와 달리 준비된 채널이 없어도 블록하지 않습니다.
selectedKeys()
select() 메서드를 통해 하나 이상의 준비된 채널이 발생하면, selectedKeys() 메서드를 사용해 준비된 채널의 집합을 받습니다.
Set<SelectionKey> selectedKeys = selector.selectedKeys();
아래와 같이 반환된 SelectionKey set을 반복해 준비된 채널에 접근할 수 있습니다.
Set<SelectionKey> selectedKeys = selector.selectedKeys();

Iterator<SelectionKey> keyIterator = selectedKeys.iterator();

while(KeyIterator.hasNext()){

	SelectionKey key = keyIterator.next();

    if(key.isAcceptable()){
	     // a connection was accepted by a ServerSocketChannel.
    } else if (key.isConnectable()) {
        // a connection was established with a remote server.
    } else if (key.isReadable()) {
        // a channel is ready for reading
    } else if (key.isWritable()) {
        // a channel is ready for writing
    }

    keyIterator.remove();
}
ServerSocketChannel
ServerSocketChannel은 클라이언트의 TCP 연결 요청이 들어올 때까지 대기하다가 요청이 들어오면 연결을 수락하는 채널입니다.
ServerSocketChannel serverSocketChannel = ServerSocketChannel.open();

serverSocketChannel.socket().bind(new InetSocketAddress(8080));

while(true) {
    SocketChannel socketChannel = serverSocketChannel.accept();

    // do something with socketChannel...
}
ServerSocketChannel은 논블로킹 모드로 설정할 수 있습니다. 논블로킹 모드에서는 accept() 메서드가 즉시 반환되므로, 들어오는 연결이 없다면 null을 반환할 수 있습니다. 따라서 반환된 ServerSocketChannel이 null인지 확인해야 합니다.
ServerSocketChannel serverSocketChannel = ServerSocketChannel.open();

serverSocketChannel.socket().bind(new InetSocketAddress(8080));
serverSocketChannel.configureBlocking(false);

while(true){
    SocketChannel socketChannel = serverSocketChannel.accept();
 읽은 데이터의 바이트 수
    if (socketChannel != null) {
        // do something with socketChannel...
    }
}
SocketChannel
SocketChannel은 TCP 네트워크 소켓에 연결된 채널입니다. ServerSocketChannel과 마찬가지로 SocketChannel 또한 논블로킹 모드로 설정할 수 있습니다.
connect()
SocketChannel이 논블로킹 모드일 때 connect() 메서드를 호출하면, 메서드 연결이 설정되기 전에 반환될 수 있습니다. 이때 연결이 설정됐는지 확인하기 위해서 finishConnect() 메서드를 이용할 수 있습니다.
socketChannel.configureBlocking(false);
socketChannel.connect(new InetSocketAddress("http://naver.com", 80));

while(!socketChannel.finishConnect()) {
    // wait, or do something else...
}
read()
논블로킹 모드일 때는 read() 메서드가 데이터를 전혀 읽지 않고 반환될 수 있기 때문에 read() 메서드를 사용할 때는 반환값(읽은 데이터의 바이트 수)을 확인해야 합니다.
멀티플렉싱 기반의 다중 접속 서버
지금까지 살펴본 내용을 바탕으로 Java NIO의 셀렉터를 이용해서 멀티플렉싱 기반의 다중 접속 서버를 만들어 보겠습니다.
import java.io.IOException;
import java.net.InetSocketAddress;
import java.nio.ByteBuffer;
import java.nio.channels.SelectionKey;
import java.nio.channels.Selector;
import java.nio.channels.ServerSocketChannel;
import java.nio.channels.SocketChannel;
import java.util.Iterator;
import java.util.Set;

public class EchoServer {

    private static final String EXIT = "EXIT";

    public static void main(String[] args) throws IOException {
        // Create Selector
        Selector selector = Selector.open();
        // Create ServerSocketChannel
        ServerSocketChannel serverSocket = ServerSocketChannel.open();
        serverSocket.bind(new InetSocketAddress("localhost", 8080));
        serverSocket.configureBlocking(false);
        // Register ServerSocketChannel to the Selector
        serverSocket.register(selector, SelectionKey.OP_ACCEPT);
        ByteBuffer buffer = ByteBuffer.allocate(256);

        while (true) {
            selector.select();
            Set<SelectionKey> selectedKeys = selector.selectedKeys();
            Iterator<SelectionKey> iter = selectedKeys.iterator();
            while (iter.hasNext()) {
                SelectionKey key = iter.next();

                // Case) ServerSocketChannel
                if (key.isAcceptable()) {
                    register(selector, serverSocket);
                }

                // Case) SocketChannel
                if (key.isReadable()) {
                    answerWithEcho(buffer, key);
                }
                iter.remove();
            }
        }
    }

    private static void answerWithEcho(ByteBuffer buffer, SelectionKey key)
            throws IOException {
        SocketChannel client = (SocketChannel) key.channel();
        client.read(buffer);
        if (new String(buffer.array()).trim().equals(EXIT)) {
            client.close();
            System.out.println("closed client.");
        }

        buffer.flip();
        client.write(buffer);
        buffer.clear();
    }

    private static void register(Selector selector, ServerSocketChannel serverSocket)
            throws IOException {
        SocketChannel client = serverSocket.accept();
        client.configureBlocking(false);
        client.register(selector, SelectionKey.OP_READ);
        System.out.println("connected new client.");
    }
}
'Java' 카테고리의 다른 글
| [Java] ConcurrentHashMap 개념과 동기화 동작 원리 (Thread-safe) (0) | 2024.01.31 |
|---|---|
| [Java] Reactor 패턴과 이벤트 루프 (1) | 2024.01.03 |
| [Java] 멀티플렉싱 기반의 다중 접속 서버로 가기까지 (2) | 2024.01.03 |
| [Network] TCP/IP와 소켓통신 Send/Recv 동작 원리( + Blocking VS NonBlocking) (1) | 2024.01.03 |
| [Java] 톰켓과 네티 서버의 차이점 (1) | 2023.12.28 |


